
Whether your air compressor is a crucial part of your business or simply a handy tool in your garage or workshop, you’ll want to make sure it continues to work properly for the long haul. The best way to ensure that is to give it the air compressor maintenance it needs. But many people don’t realize just how much maintenance their air compressors require – let alone how to go about performing it.
So in this article, I’ll give you a complete guide to maintaining your air compressor, including a step-by-step walkthrough of each task, a recommended air compressor maintenance schedule, and a few tips to make things easier.
Table of Contents
- Read the User’s Manual Before Getting Started!
- Preventive Maintenance
- 1. Drain Liquid from the Tank
- 2. Check and Tighten Fasteners
- 3. Check and Tighten Electrical Connections
- 4. Inspect Hoses and Connectors
- 5. Clean External Components
- 6. Check/Change Air Filters
- 7. Check Oil Level
- 8. Change the Oil
- 9. Change Oil Filter and Air/Oil Separator
- 10. Test Safety Mechanisms
- 11. Inspect Belts (If Applicable)
- 12. Clean Fuel Tank
- How Often Should You Service an Air Compressor?
- Air Compressor Maintenance Schedule/Checklist
- General Air Compressor Maintenance Tips
- Common Maintenance Pitfalls To Watch Out For
- What Maintenance Should We Call A Tech For?
- How To Create A Maintenance Schedule
- In Conclusion
- Air Compressor Maintenance FAQ’s
Read the User’s Manual Before Getting Started!
Before you attempt to perform any kind of maintenance task on your air compressor, it’s imperative to consult your compressor’s user manual first. This guide will offer generic instructions for performing basic tasks, but only your manual can provide the instructions specific to your air compressor.
This will ensure that you perform each task safely and without causing any damage to the unit. Further, failing to follow the manufacturer’s instructions may even void your warranty. Your owner’s manual is also likely to contain additional tips and important safety information unique to your model of air compressor.
Preventive Maintenance
Like any machine, air compressors can get worn out over time, particularly with frequent use. The key to maintenance is minimizing the amount of wear and tear they experience and preventing issues that can result in costly repairs or an all-out replacement down the road. So in this section, I’ll provide a list of the key preventive maintenance tasks as well as basic instructions for performing them.
1. Drain Liquid from the Tank
When ambient air is compressed, the water vapor it contains will be condensed into liquid form. This condensate will collect inside the compressor’s tank. If it’s allowed to remain inside, it can contaminate the air supply or cause the tank to rust. This is why manufacturers generally recommend draining the tank after each use. Here’s how it’s done.
- Step 1 – Turn off the air compressor.
- Step 2 – Open the tank relief valve until the tank is drained to 30 PSI or less (this will help force out liquid).
- Step 3 – Place a drain pan under the drain plug at the bottom of the tank.
- Step 4 – Slowly unscrew the drain plug and let the moisture drain out. You may need to tilt it slightly to get all the liquid out – but be careful not to tilt it too far.
- Step 5 – Once the tank is empty, re-tighten the drain plug (do not overtighten).
2. Check and Tighten Fasteners
As you’re probably aware, air compressors tend to vibrate quite a bit when they’re running. All that vibration can cause nuts, bolts, and screws to loosen up over time. This can result in excessive vibration, leaks, or other issues, so it’s a good idea to periodically check all fasteners for tightness.
- Step 1 – Test all nuts, bolts, and screws by hand with a wrench, nut driver, or screwdriver.
- Step 2 – If loose, tighten them by hand until they are snug and no longer move – do not overtighten, as this may damage the thread or strip the hardware.
3. Check and Tighten Electrical Connections
Vibration may also cause electrical connections to come loose over time. This can lead to short-circuits or unit failure, so it’s a good idea to make sure all wires are secure. Your user manual should have more detailed instructions and diagrams for this, or it may simply instruct you to have it done professionally.
- Step 1 – Turn off and unplug the air compressor.
- Step 2 – Inspect accessible electrical connections and wiring for looseness and damage.
- Step 3 – Gently tighten connections (typically done with a screw or bolt) – avoid over-tightening.
4. Inspect Hoses and Connectors
No air compressor component is as susceptible to everyday wear and tear as the air hose. After being stretched out, coiled up, bent, twisted, exposed to the elements, and repeatedly expanded and contracted, an air hose can get pretty beat up. If it springs a leak, it will not only affect efficiency but may also put undue strain on the pump motor. If your hose is cracked, split, or otherwise damaged, simply replace it with a new one.
Make sure to check your hose connectors for leaks while you’re at it – they’re typically fairly noticeable, as they may produce a hissing sound or cause the pump to cycle on frequently.
5. Clean External Components
Workspaces tend to be fairly dirty places – there’s no getting around that. Dust, dirt, sawdust, metal shavings, cobwebs… the list of particulates and debris in a typical workspace goes on and on. These things can accumulate on certain components of your air compressor and hinder its function. Keeping your air compressor free of this gunk buildup is essential for prolonging its life and preventing issues.
- Step 1 – Unplug the air compressor and inspect for gunk buildup. The key places to check are the air intake vents (located on the air filter components), compressor fan grate, and cooling fins, or any other air pathways on the pump housing.
- Step 2 – Use compressed air (in a can) to blow away dust and debris. Scrub gently with a soft brush if necessary, then wipe clean with a microfiber cloth.
6. Check/Change Air Filters
With dust and debris being inevitable, air compressors have air filters to capture particulate matter as they pull in ambient air to be compressed. These filters will eventually become saturated, which can allow dirt and dust to enter the pump, where it can damage valves, gaskets, or other internal components and contaminate the air supply. The filters will need to be changed periodically to prevent this from happening.
- Step 1 – Unplug the air compressor.
- Step 2 – Remove the filter cover.
- Step 3 – Remove the filter element and replace it with a new one. (Some models may be cleaned rather than replaced, or require that the entire filter assembly be replaced. Consult your user manual to determine the correct course of action.)
In some cases, you may be able to clean your filter element a few times before you need to replace it. To do this, simply blow it off thoroughly with compressed air. Some filter elements can be rinsed out with water and dried before being put back in – check with your user manual/filter package to determine how to clean it properly.
7. Check Oil Level
If your air compressor uses oil, you’ll want to keep an eye on the oil level. It’s best to check this before every use. Some models feature a sight glass that allows you to see the oil level easily, while others may use a dipstick or other method. The oil should come to the middle of the sight glass or within the marked range on a dipstick.
8. Change the Oil
For oil-lubricated compressors, few things are as important as changing the oil regularly. It can eventually become dirty, get contaminated with moisture, or develop tannins – all of which can lead to damage or overheating of the pump motor. Your user manual should state the recommended oil change schedule as well as the oil type and capacity of your unit.
- Step 1 – Run the compressor for a minute or two to warm up the oil (it should be warm, but not hot).
- Step 2 – Turn off and unplug the unit.
- Step 3 – Place a drain pan under the oil drain plug.
- Step 4 – Remove the drain plug and allow all of the oil to drain into the pan.
- Step 5 – Replace the drain plug.
- Step 6 – Remove the fill plug and pour in the new oil until it’s at the appropriate level. (Do not overfill.)
- Step 7 – Replace the fill plug.
9. Change Oil Filter and Air/Oil Separator
Some oil-lubed compressors feature filters to help keep the oil clean and prevent oil vapor from getting into the air tank. Routinely replacing these filters is key to ensuring the longevity and proper function of your air compressor. The process of replacing them can be complicated and may differ widely among models, so refer to your user manual for detailed instructions on how to change these. In some cases, they may need to be replaced by a professional service technician.
10. Test Safety Mechanisms
Air compressors typically have several mechanisms designed to prevent damage to the unit and/or injury to the user in the event of a malfunction – overheating, excessive pressure. Some of these may be electrical, while others may be mechanical. In either case, it’s a good idea to test them periodically to ensure that they’re functioning properly. Again, since each model is different, you’ll have to check your user manual for instructions on how to perform these tests.
11. Inspect Belts (If Applicable)
If your unit features a belt drive system, you’ll want to simply inspect the belts regularly for wear, damage, and correct tensioning. Belts are some of the first things to wear out on an air compressor. They often let you know when they’re getting worn by producing unusual sounds, but you shouldn’t rely solely on that. If your belt requires replacing, your user manual should include instructions on how to install a new one and tension it properly.
12. Clean Fuel Tank
If your air compressor uses fuel for power (such as gas or diesel), you’ll want to clean out the fuel tank periodically to prevent fuel particulates from building up inside. At the risk of sounding like a broken record, you’ll want to check your user manual for instructions on this task, since they are likely to be specific to your model – and since many manufacturers prefer that this be performed by a professional.
How Often Should You Service an Air Compressor?
How often you service your air compressor ultimately depends on how much use it gets. If the unit sees occasional use, annual air compressor maintenance should suffice, but if it’s used often, quarterly service may be necessary. However, some tasks should be performed more often than others – some even daily.
Other than the daily tasks, air compressor service frequency is based primarily on hours of usage rather than a fixed calendar schedule. For instance, it’s generally recommended that the oil be changed after every 1,000 hours of use, at minimum. Air filters, oil filters, and air/oil separators should typically be changed after every 1,000 to 2,000 hours of use.
Each model is different, however – your user manual will outline the manufacturer’s recommended air compressor maintenance schedule for your specific unit.
Air Compressor Maintenance Schedule/Checklist
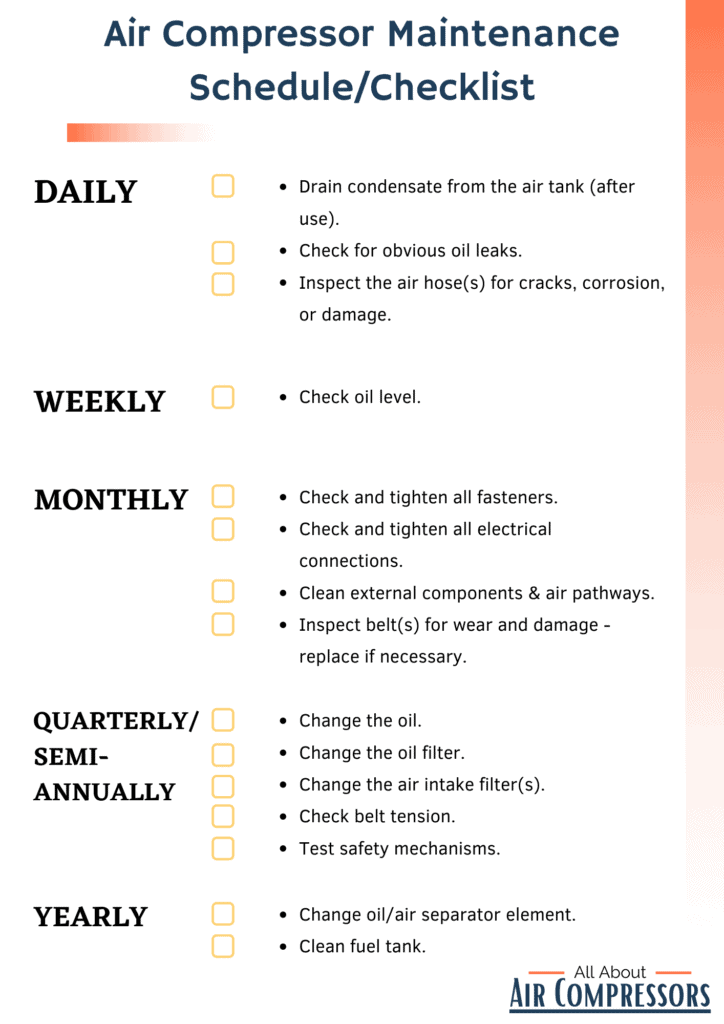
While every model is different and the manual for your particular air compressor should include a recommended air compressor maintenance schedule, here is a general breakdown of how often certain tasks should be performed. Again, this is just a guideline.
Daily
- Drain condensate from the air tank (after use).
- Check for obvious oil leaks.
- Inspect the air hose(s) for cracks, corrosion, or damage.
Weekly
- Check oil level.
Monthly
- Check and tighten all fasteners.
- Check and tighten all electrical connections.
- Clean external components & air pathways (do more frequently if your area is particularly dirty or you can see accumulated gunk).
- Inspect belt(s) for wear and damage – replace if necessary.
Quarterly/Semi-Annually
- Change the oil.
- Change the oil filter.
- Change the air intake filter(s).
- Check belt tension.
- Test safety mechanisms.
Yearly
- Change oil/air separator element.
- Clean fuel tank.
Depending on what type of compressor you have (piston, rotary screw, oil-free, etc.), you may need to perform some tasks more often. Consult your user manual for your specific air compressor maintenance requirements and schedule.
General Air Compressor Maintenance Tips
Now that you have your air compressor maintenance checklist and an idea of when to perform each task, here are a few extra tips to help you keep your air compressor healthy and functional longer.
1. Keep the Area Clean
One key thing that will help prevent issues and stretch the intervals between certain maintenance tasks is to keep your workspace as clean as possible. This may not be possible if you’re transporting your compressor around to different job sites, but if you primarily use it in your garage or workshed, you can exercise at least some level of control.
This simply means cleaning up sawdust, dirt, and any other kinds of dust or debris as soon as you’re done working. All of this junk can get kicked up and make its way to your air compressor, where it will build up on air pathways and filters, meaning you’ll have to clean and/or change them more frequently. So if you want your filters to last (and spend less time performing maintenance), a little bit of general cleanup goes a long way.
2. Don’t Use Extension Cords (If You Can Help It)
Air compressors don’t like extension cords. This is because they typically reduce the flow of power to the compressor motor, degrading the motor and increasing the likelihood of a motor failure over time. Instead, it’s best to use a longer air hose, as this won’t put any undue strain on the motor.
If you absolutely need to use an extension cord, it’s best to use one that’s fairly short and is rated to handle the power consumption of your compressor. Likewise, try to avoid plugging your compressor into power strips – most power strips are designed for fairly low-amperage appliances, so a compressor may overload them. This will not only stress your compressor motor but also creates a fire hazard.
3. Avoid Tipping Your Compressor Over
You can also save yourself a lot of trouble by keeping your compressor on level ground and not turning it on its side during transport. This is especially important with oil-lubricated compressors, as the oil can seep into places it’s not supposed to and cause problems. But even tipping an oil-free compressor can be problematic, as any moisture or gunk in the air tank can interfere with internal valves.
Common Maintenance Pitfalls To Watch Out For
Air compressors are essential pieces of equipment in many industrial and commercial settings. However, they require regular maintenance to ensure that they function properly. Here are some common maintenance pitfalls to watch out for when performing air compressor maintenance:
- Neglecting routine maintenance Routine maintenance is critical to the proper functioning of your air compressor system. Neglecting routine air compressor maintenance can lead to costly repairs and downtime. Make sure to follow the manufacturer’s recommended maintenance schedule and perform regular checks on your air compressor.
- Ignoring air leaks Air leaks are a common problem in air compressor systems. They can lead to decreased efficiency and increased energy costs. Make sure to regularly check your air compressor system for leaks and repair them promptly.
- Not monitoring operating temperature The operating temperature of your air compressor system is critical to its proper functioning. Overheating can cause damage to the compressor pump and other components. Make sure to monitor the operating temperature and take action if it exceeds the recommended range.
- Failing to check air pressure The air pressure in your compressor system must be within the recommended range for it to function properly. Failing to check the air pressure can lead to decreased efficiency and increased energy costs.
What Maintenance Should We Call A Tech For?
While routine maintenance can be performed by the operator, some maintenance tasks require the expertise of a trained technician. Here are some maintenance tasks that you should call a tech for:
- Belt tension Proper belt tension is critical to the functioning of your air compressor system. If the belt tension is too loose or too tight, it can cause damage to the compressor pump and other components. Call a technician to adjust the belt tension.
- Safety relief valve The safety relief valve is a critical component of your air compressor system. It prevents over-pressurization and ensures the safety of your equipment and personnel. Call a technician to inspect and replace the safety relief valve if necessary.
- Clean heat exchangers Heat exchangers are critical components of your air compressor system. They transfer heat from the compressed air to the surrounding environment. Over time, they can become dirty and clogged, reducing their efficiency. Call a technician to clean the heat exchangers.
How To Create A Maintenance Schedule
Creating a maintenance schedule for your air compressor system is critical to its proper functioning. Here are some steps to follow when creating a maintenance schedule:
- Determine maintenance tasks The first step in creating a maintenance schedule is to determine the maintenance tasks that need to be performed on your air compressor system. These tasks can include routine maintenance, preventive maintenance, and repairs.
- Assign frequency Once you have determined the maintenance tasks, assign a frequency for each task. The frequency will depend on the manufacturer’s recommendations and the specific needs of your air compressor system.
- Prioritize tasks Some maintenance tasks are more critical than others. Prioritize the tasks based on their importance and the potential impact on your air compressor system.
- Schedule downtime Performing maintenance on your air compressor system will require downtime. Schedule the maintenance during a time when the system is not in use to minimize disruption to your operations.
- Document and track Document the maintenance schedule and track the completion of each task. This will help you ensure that all necessary maintenance is performed on time and that your air compressor system is functioning properly.
By following these steps, you can create a comprehensive maintenance schedule for your air compressor system that will help ensure its proper functioning and longevity.
In Conclusion
I hope this article has helped you understand what all goes into air compressor maintenance and given you a clear picture of how to perform it. Most of the tasks are fairly straightforward, so keeping your compressor in good shape should be a breeze. Thanks for reading!
Air Compressor Maintenance FAQ’s
How often should I change the oil in my air compressor?
It is recommended that you change the oil in your air compressor every 500-1,000 hours of use or at least once a year, whichever comes first.
How do I check the oil level in my air compressor?
To check the oil level, first make sure the compressor is turned off and the engine is cool. Then remove the oil fill cap and wipe the dipstick clean.
Insert the dipstick back into the oil fill hole, but do not screw it in. Remove the dipstick and check the oil level. The oil level should be between the two marks on the dipstick.
How often should I replace the air filter in my air compressor?
It is recommended that you replace the air filter in your air compressor every 3-6 months, depending on the frequency and intensity of use.
How do I drain the water from my air compressor tank?
To drain the water from your air compressor tank, first turn off the compressor and disconnect it from the power source. Locate the drain valve at the bottom of the tank and place a container underneath it to catch the water.
Open the drain valve and let the water drain completely. Close the drain valve and reconnect the compressor to the power source.
What should I do if my air compressor is making unusual noises?
If your air compressor is making unusual noises, it is important to shut it off immediately and investigate the cause of the noise. Common causes of unusual noises include loose or worn-out parts, a clogged air filter, or low oil levels.
It is recommended that you consult your user manual or a qualified technician to diagnose and fix the issue.
